

How To Change A Thermostat On A Car
Dan Ferrell writes nigh do-it-yourself motorcar maintenance and repair. He has certifications in automation and control technology.
A bad thermostat can crusade engine overheating or not allowed the engine to reach operating temperature.
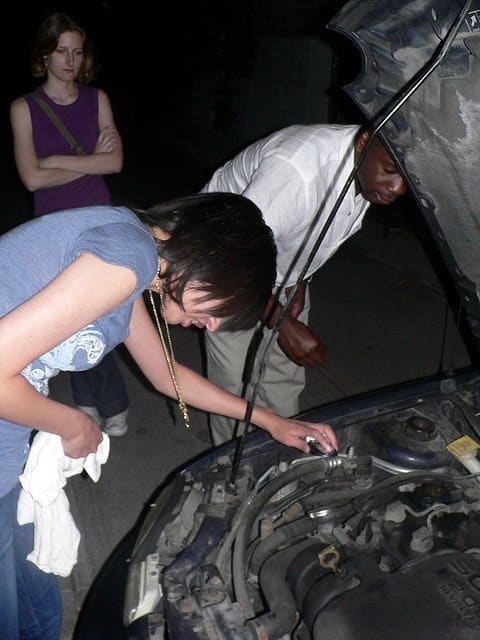
Photo courtesy of Christopher Blizzard
Car thermostat replacement is not hard. But, you exercise need to pay special attending to primal points in the process.
What to Know to for Auto Thermostat Replacement
- How to access the thermostat housing
- Using the correct tools
- Preparing the surfaces for the new installation
- Getting the correct thermostat for your awarding
- Installing the new thermostat correctly
- Bleeding the cooling organization to prevent overheating
Overlooking a modest detail that may seem inconsequential at first can lead to cooling arrangement problems and more than expensive repairs.
The 10 essential tips presented in this guide volition help you lot supplant your car thermostat properly. They'll help y'all avoid issues similar coolant leaks, thermostat housing impairment and stripped threads associated with poor thermostat service.
You lot'll notice near car thermostats near the acme and to ane side of the engine—which makes your chore easier—and less frequently toward the lower department of the block. And, while you may demand to remove one or two accessories to gain access to the thermostat, you tin replace information technology in your own garage in about an hour or and then, using a few elementary tools.
If you know your motorcar thermostat has failed, get alee and alter it using these tips. However, if you don't know whether the thermostat is bad, check this other article about troubleshooting the thermostat.
| Index |
|---|
| Some Tools You May Need |
| Motorcar Thermostat Replacement |
| ane. Cool the Engine |
| 2. Drain Some Coolant |
| iii. Access to the Thermostat Housing |
| four. Employ the Appropriate Tool |
| 5. Remove the Thermostat Housing |
| half-dozen. Check Thermostat Alignment |
| 7. Clean the Mating Surfaces |
| eight. Go a New Thermostat |
| 9. Use the Advisable Seal |
| 10. Install the New Thermostat |
| A Systematic Arroyo to Car Thermostat Replacement |
| Some Tools Y'all May Need |
|---|
| * Catch pan |
| * Floor jack, if necessary |
| * ii jack stands, if necesary |
| * Ratchet and six-bespeak socket set |
| * Standard and/or Phillips screwdriver |
| * Rags |
| * Plastic scraper |
| * Fresh coolant, if necessary |
| * Chocks |
| * Six-point wrench set |
| * Torque wrench |
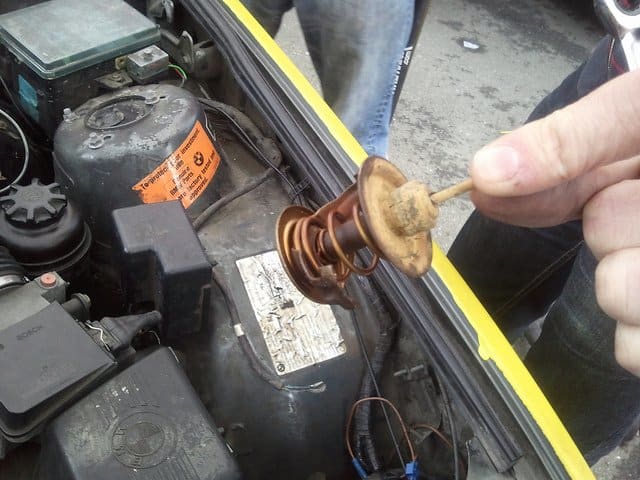
A stuck thermostat can overheat and seriously damage your machine engine.
Photo courtesy of Slava on Flickr
Machine Thermostat Replacement
The all-time way to go about your repair job—if this is your first fourth dimension replacing a automobile thermostat—is to use the service manual for your particular vehicle brand and model.
Nonetheless, the side by side x tips may exist sufficient to supervene upon the thermostat in many models, since the unit of measurement is readily accessible, and yous may not need to remove components, except some parts from the air cleaner assembly.
If you all the same demand some help, though, the manual provides a step past step process to replace the thermostat for your specific model, how to deal with components that might cake admission to the thermostat housing, torque specifications, and the haemorrhage process for your vehicle, if necessary.
Buy an inexpensive, aftermarket copy online like this Haynes manual, from Amazon. It comes with many step-past-stride procedures for many maintenance, troubleshooting, and replacement tasks that will aid you lot in the future. So the manual pays for itself in a few days.
Scroll to Continue
Read More from AxleAddict
Following your service manual, pay attention to the next important tips to avoid potential repair problems associated with car thermostat replacement.
So, permit's start replacing the thermostat.
Brand sure the engine is cool earlier you lot showtime replacing the thermostat.
Photograph courtesy of Santeri Viinamäki on Wikimedia
one. Absurd the Engine
Expect for the radiator and engine to cool before attempting to replace the thermostat. When hot, the cooling system is nether pressure and y'all'll seriously fire yourself unintentionally by releasing a gush of hot or boiling coolant.
2. Drain Some Coolant
Drain about two quarts of coolant using the radiator drain valve before disconnecting the upper radiator hose from the thermostat shell. This will bring the coolant level to below the thermostat housing and preclude coolant from splashing over belts and other components after separating the upper radiator hose.
- Coolant causes some parts, particularly rubber, to deteriorate over fourth dimension. You lot may need to raise the front of your vehicle and remove a splash shield to reach the radiator valve. After raising your vehicle, brimming the rear wheels and support your car on jack stands.
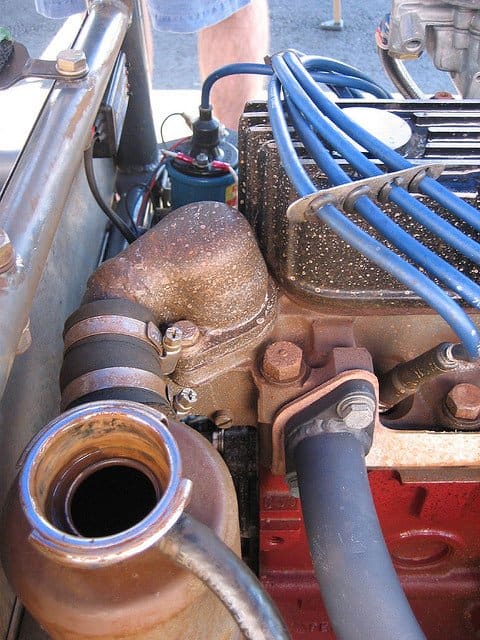
three. Access the Thermostat Housing
Disconnect the upper radiator hose from the thermostat housing. To locate the thermostat housing:
- Follow the upper radiator hose back to the engine. On some models, you lot need to remove the air filter assembly to clear the area around the thermostat example. If necessary, disconnect the thin hose and electrical sensor connector from the thermostat housing.
- Subsequently removing the clamp securing the upper hose to the thermostat casing, you lot may find out that the hose refuses to come off. To break the seal, advisedly insert a thin, flat-head screwdriver at different points betwixt the hose and the plumbing fixtures.
- Then, twist the hose dorsum and forth while carefully pulling it off the thermostat housing.
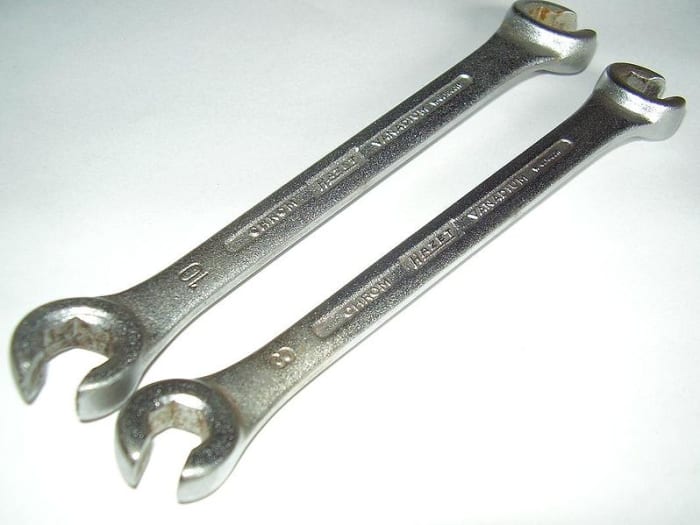
Use a line wrench or six-bespeak socket tool to forbid damage to bolts.
Photo courtesy of Gamsbart on Wikimedia
Apply a six-signal wrench or six-point socket of the correct size when removing the ii or iii housing mounting bolts. Using a six-betoken tool will avert rounding off the bolts' heads.
v. Remove the Thermostat Housing
When trying to elevator the thermostat housing, if y'all detect it doesn't motion, lightly tap it with a safe mallet or screwdriver's plastic handle.
- Do not use a wrench or a regular hammer. Thermostat casings are fabricated of aluminum or plastic and can easily interruption.
6. Check Thermostat Alignment
Advisedly lift the thermostat housing away from the engine. Earlier removing the thermostat, pay attention to the fashion the thermostat aligns inside the housing.
- To bank check the alignment, note which direction the bleed pin—near the edge on the round base of the thermostat—points to.
- You volition take to install the new thermostat with the bleed pin pointing in the same direction as the erstwhile ane.
- Some thermostats come with a guiding tab that fits into a recess on the mounting base to prevent maligning the thermostat.
vii. Clean the Mating Surfaces
After removing the thermostat, cover the thermostat opening on the engine with a clean rag to prevent sealant or gasket material from going into the engine.
To clean the thermostat housing and engine mating surfaces:
- Use a plastic scraper, if yous need to remove old gasket textile and sealing compound. Avoid using a metal scraper that tin gouge the mating surfaces. This may lead to coolant leaks.
Make sure the new thermostat aligns perfectly inside before tightening the mounting bolts.
Photo courtesy of Joe Goldberg on Flickr
8. Get a New Thermostat
When buying the new thermostat, go one with the same temperature rating your car manufacturer specifies for your vehicle. You'll find this information in your vehicle service transmission.
- Well-nigh vehicle models apply a 192F or 195F rated thermostat.
- If you install a thermostat with a dissimilar rating temperature, y'all'll end upwardly with all kinds of performance problems like fuel, emission and ignition arrangement problems, because your engine will operate out of its normal temperature range.
9. Use the Advisable Seal
Almost new thermostats come with their own gaskets or prophylactic seal, only non all. So check that your new thermostat includes i; otherwise, buy ane.
- Remember that you may need to employ sealant to the new gasket—check your vehicle service transmission. Just use the sealant recommended past your machine manufacturer and use a small amount. Using too much sealant may damage an oxygen sensor and disrupt engine functioning.
- Some thermostats come with a rubber seal instead of a traditional gasket. Before installing, apply a light coat of fresh coolant to the seal.
- Some models utilise a liquid gasket instead. Consult your repair manual, if necessary.
- Verify that the mating surfaces on the thermostat housing and the engine block are perfectly clean.
10. Install the New Thermostat
Compare the new thermostat to the erstwhile one. And then, position the new 1 in place forth with its seal, and tighten the housing bolts using a torque wrench.
- Expect for a marker on the thermostat indicating which terminate should face the radiator. If you can't find the marking, just make sure the spring (sensor) end faces the engine.
- Also, some thermostats accept locating pins that will help you to position the thermostat in the housing and block.
- Your automobile repair transmission specifies the torque value for the thermostat mounting screws. This will forbid cracking the plastic shell, leaving the shell loose and causing coolant leaks, or damaging the bolts' threads.
- When ready, top up the radiator with coolant to supplant the amount you removed, and bleed the cooling organisation, if your car manufacturer recommends it—you can follow 1 of the bleeding procedures described in this mail service about how to change coolant, or cheque your vehicle service transmission.
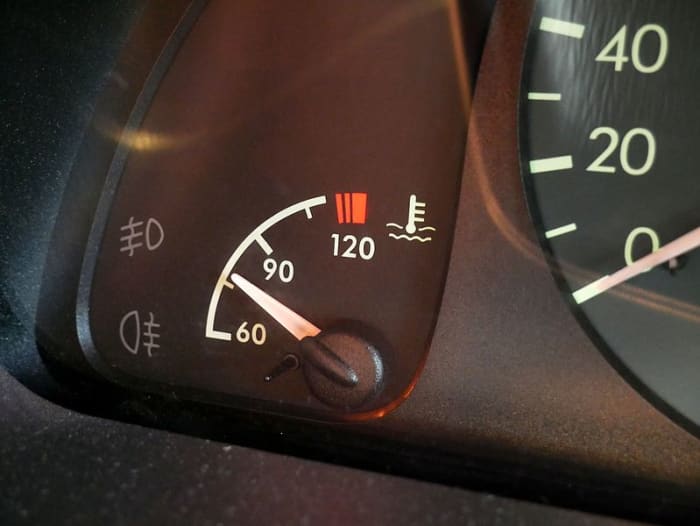
- Trapped air will cause your engine to overheat. The next video gives you an idea about how to bleed the organisation in your vehicle as well, using a special funnel designed for this purpose.
- Then, examination your repair chore past starting the engine and checking for coolant leaks and coolant level.
A Systematic Approach to Car Thermostat Replacement
A car thermostat replacement job is within the reach of the boilerplate car possessor. You lot don't need special skills or tools. And y'all tin exercise it in your own garage. Just it doesn't mean that nothing could become wrong.
The little details will get you in trouble when you don't know or forget about them. Doing a striking-or-miss repair chore or following the incorrect procedure will consequence in a much more expensive job than taking your automobile to the repair shop in the outset place.
If in doubt, consult the vehicle repair manual for your detail auto brand and model. The 10 tips described here point out the most common details y'all are most probable to miss and go yous in problem when replacing your motorcar thermostat. So proceed these tips handy and consult them every bit necessary.
And here is a video that tin also assist you visually to complete your repair job.
This commodity is accurate and true to the best of the author's noesis. Content is for informational or amusement purposes only and does not substitute for personal counsel or professional advice in business concern, financial, legal, or technical matters.
Questions & Answers
Question: What kind of coolant thermostat is best for my 1999 Pontiac G Am? Should I purchase the 180 degrees or 190 degrees estrus resistance?
Answer: If you lot take the iv cylinder model, you may use the 180; for a 6 cylinder you tin can utilize the 190 degrees range. It runs a lilliputian hotter. If possible, you lot might want to check your vehicle service manual. If you don't have a copy, look it up in the reference section of your local library.
Question: I got my car thermostat replaced and had to make full the coolant 3 times. Is that normal?
Respond: It is possible. When you offset install the thermostat, it is closed. Then you try to top off the system, but there remain some air pockets that either yous need to bleed or the system itself will 'burp', like in some newer cooling systems.
Question: I inverse my car thermostat, and now information technology overheats. This merely happens when the engine is cool, and yous drive like one or 2 miles. One time it overheats, I just loosen the radiator cap, and the car goes back to normal. What could exist the problem?
Answer: There could be air trapped in the arrangement. Sometimes it is necessary to purge the thermostat system more than once.
Question: Do I use the sealant for the thermostat replacement towards the motor?
Answer: Yes, make sure the gasket is properly centered. Some gaskets come up with an adhesive bankroll that will agree the thermostat in place, as well.
Question: Once I modify my automobile's thermostat volition the raffling sound stop?
Reply: Maybe not. You lot need to locate the source of the audio. A slice of rubber hose may help here.
Question: What is a good tip to assure that the thermostat is ever facing the correct way? The coolant ordinarily flows top to lesser of the radiator, right? Then which end would I want facing the period?
Answer: Have the spring face up the engine; the pointy side towards the radiator.
Question: I have put a new thermostat and housing but now the fan kicks in after a while and never stops running. What could exist the problem?
Answer: The thermostat might be sticking closed or partially open. Check the temperature guess when the fan kicks in and see if there are any movement of the guess after a while. This other post may help you do a little diagnostic:
https://axleaddict.com/automobile-repair/Why-is-My-Auto-T...
Question: I inverse my thermostat because my car was giving a code that said it was bad. Also, the heater stopped working simply I wasn't having overheating problems. After changing it, the lawmaking still hasn't gone away and my estrus still isn't working. Do you take any suggestions?
Answer: Trouble lawmaking P0128 is usually related to a faulty thermostat, but a faulty intake air temperature (IAT) sensor, faulty radiator fan, bad engine coolant temperature (ECT) sensor and low coolant level can trigger this lawmaking. Make sure the heater is non clogged or leaking.
Question: How long should I let the thermostat seal sit down before I check for leaks ?
Answer: It takes a few hours. But check the instructions that come with the product to be condom.
Question: Can you replace the thermostat without noticing that the housing is leaking and needs to be replaced?
Answer: Information technology may be possible if the leak is small and subconscious from view. If this is a gasket issue, information technology'll be fixed when yous correctly installed the new one. If the housing is croaky, the leak probably volition return.
Question: Does the gasket go on first earlier the thermostat when replacing information technology?
Respond: It depends on your detail model. Whatever works for your item configuration. Brand sure the sealing surface is make clean before installing the gasket. Put everything in place without the mounting bolts and make sure it'southward going to seal properly.
Question: Does a thermostat have a serial number one can use to identify a specific one for each auto?
Respond: Not necessarily. One serial number may apply to more than one model. If you lot want to exist admittedly sure you're getting the correct replacement, you can use your machine's VIN number located on your registration menu or the interior of the dashboard, driver side.
Question: Where should the jiggle pin confront on a 351 clevland?
Answer: If you are using the special 351c thermostat, the pin points to the radiator. This other mail shows also the 351C Robert Shaw thermostat.
https://kvicksilverpuman.blogspot.com/p/351c-cleve...
Question: How do I get my car to terminate leaking around the lesser bolt holding the thermostat? I have gotten a new one and gasket withal information technology is still leaking and didn't until I replaced the water pump.
Answer: Double check the mounting bolts are torqued to specs and using the proper mounting bolts. Consult the repair manual for your particular brand and model. Then, make sure the O-ring or gasket was properly installed. Also, the thermostat housing or mounting surface might be damaged and non sealing properly. Sometimes you may be able to use RTV sealant if the mounting surface is damaged. Or supervene upon the housing, if necessary.
Question: I inverse my thermostat but did not apply a new gasket. I reused the original safety gasket. The bank check engine light is still only. The temperature judge is not working at all. The air temp in the car does warm up, only not really hot like previously. The thermostat is not OEM - aftermarket but adept reviews. I'thou still getting codes P0125 & P0128. Any suggestions?
Answer: Brand sure the coolant level is OK. There tin also exist a trouble with the coolant temperature sensor (CTS) or temperature sending unit. If the sensor is running erratically, the computer may exist running the cooling fan for longer than needed. Have the CTS air temperature sensor checked.
Question: I just purchased a new thermostat for my 1995 Chevy Blazer, iv.3liter. And my seal is manner larger than the radius of the thermostat. Information technology doesn't fit around the edge of the thermostat itself. Is this size difference normal for a 1995 Chevy Blazer thermostat?
Reply: Y'all may have the wrong seal for the application. Normally, a seal will fit into a groove on the mating surface to properly block any leaks. Cheque closely and run into if you can place the seal in its groove; otherwise, bank check with your local auto parts for a new seal and compare it to the mating surface of the thermostat housing before you buy it.
Question: Can I utilise the aforementioned safety from my old thermostat on my new thermostat?
Respond: It's better to supervene upon it. They also wearable from the heat and eventually fail.
Question: I just purchased a new thermostat and gasket. Even so, the thermostat will not fit with the gasket on it. Is there a detail method of installing the thermostat that won't cause the gasket to come up off?
Reply: Make sure the quondam gasket is not stuck to the mating surface. Clean any residue around both surfaces. Also, double-check that you lot got the correct office for your application. You may need an OEM part if you got a different one. Another possibility is that the gasket is shifting position when yous try to install it. Endeavour holding the gasket in place past calculation a sparse layer of petroleum jelly.
© 2014 Dan Ferrell

Source: https://axleaddict.com/auto-repair/How-to-Replace-a-Thermostat
Posted by: peaseandided.blogspot.com
0 Response to "How To Change A Thermostat On A Car"
Post a Comment